
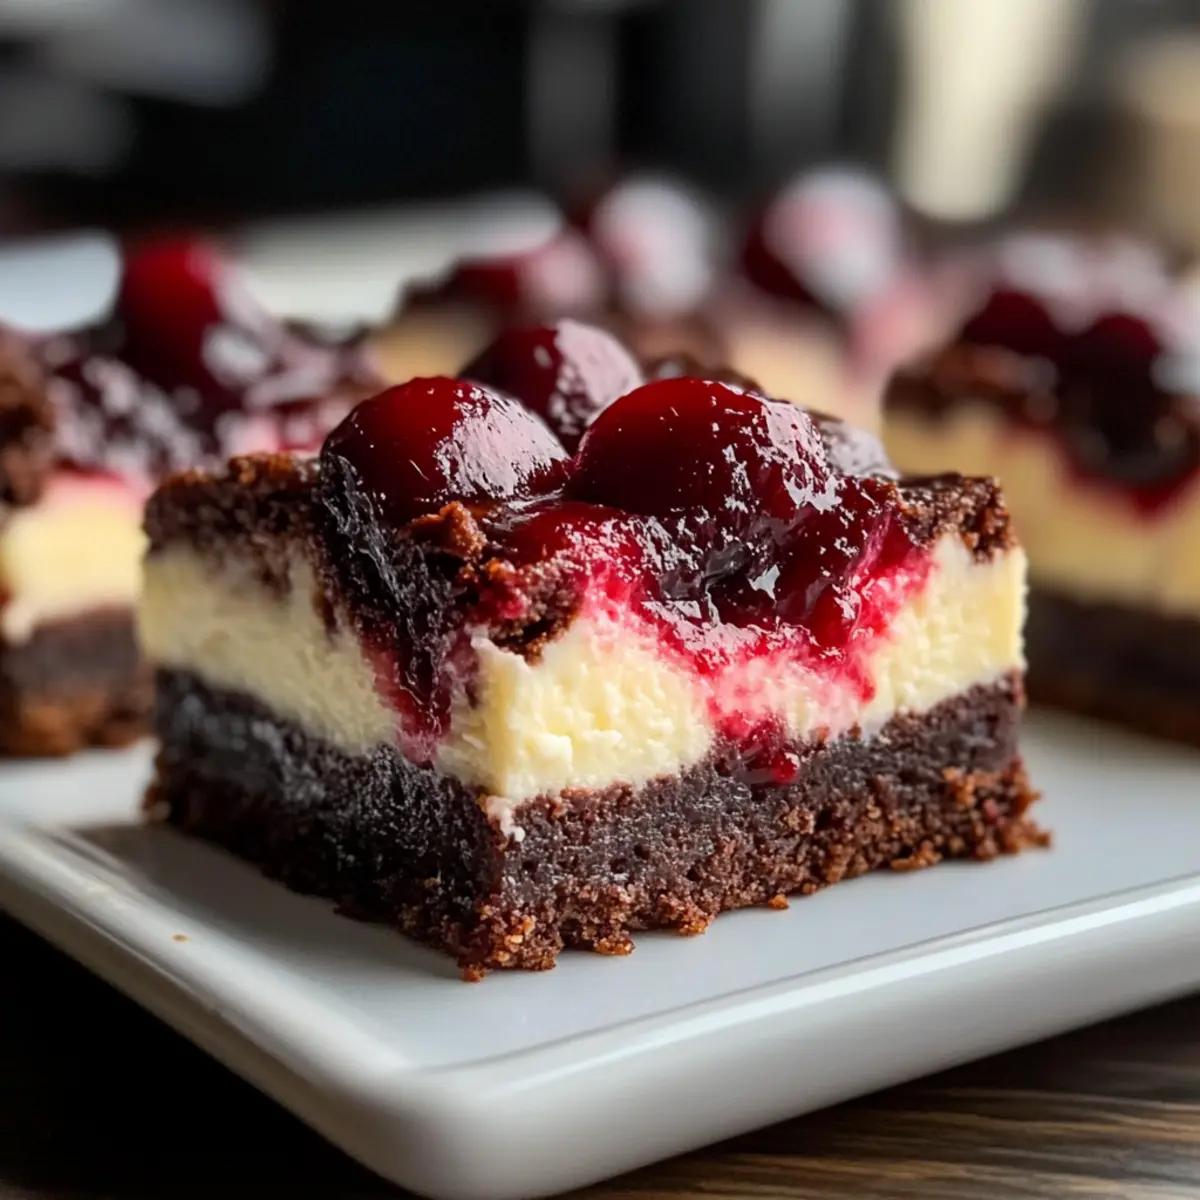
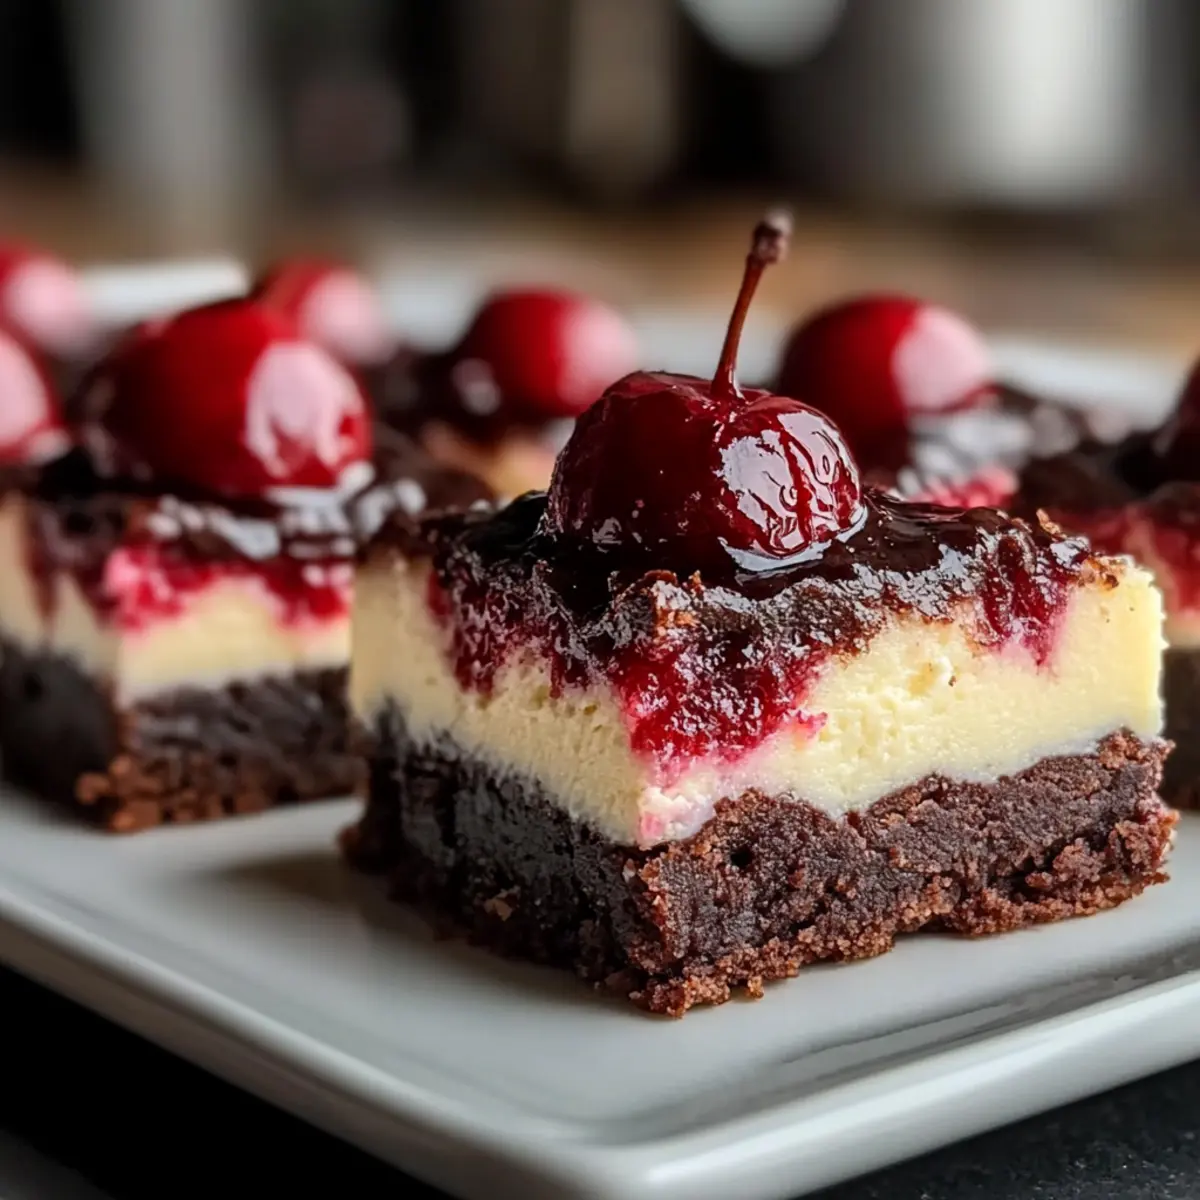
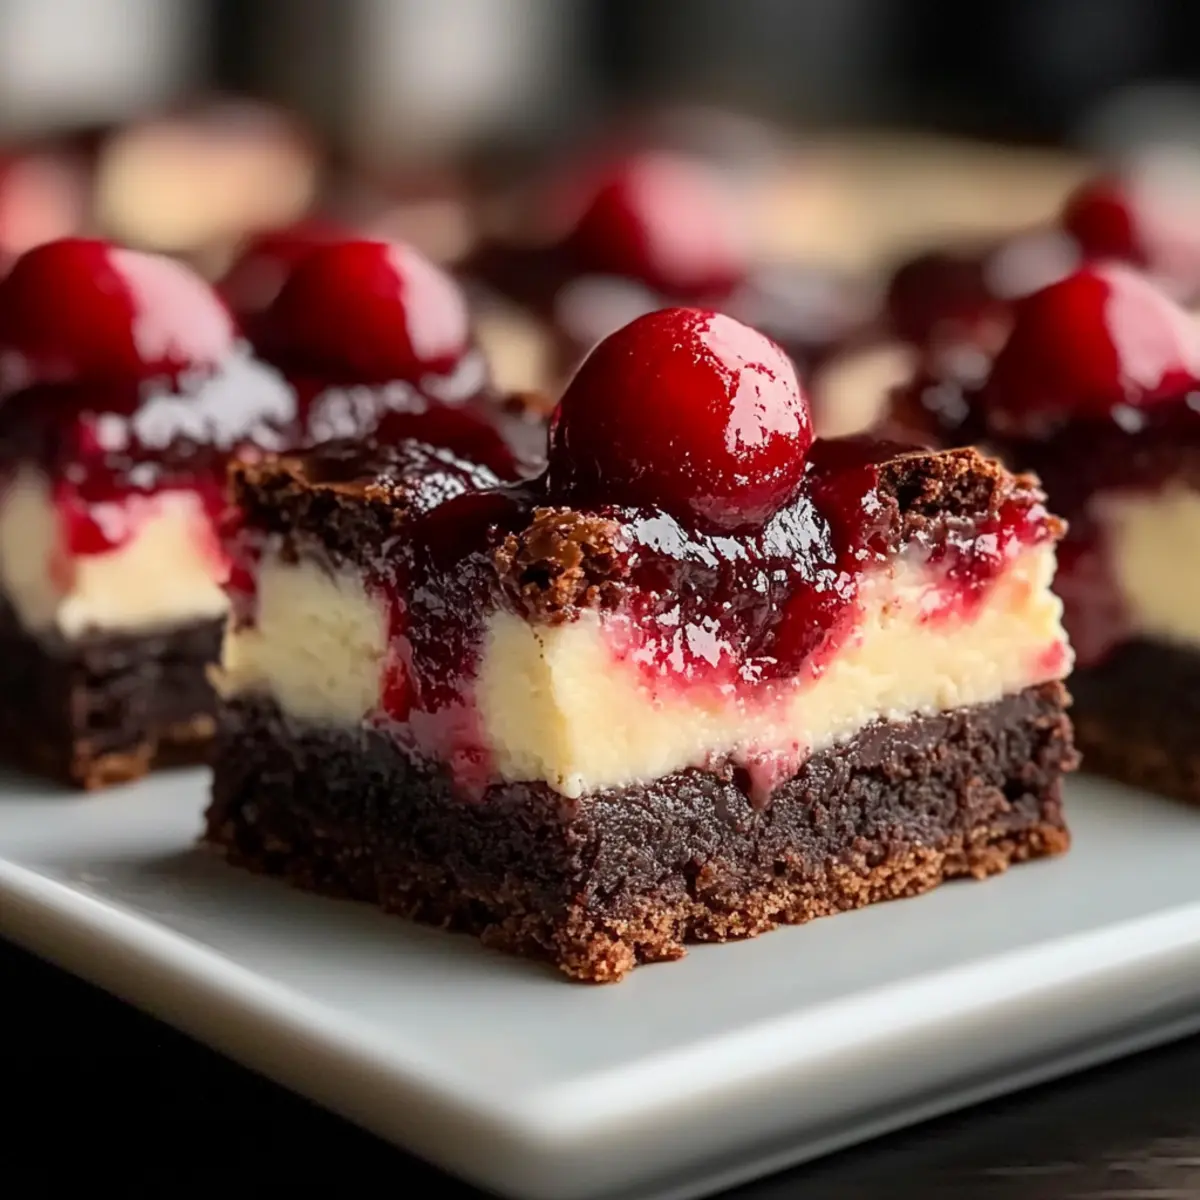
The moment I tasted a slice of Cherry Cheesecake Brownie Bars, I knew I’d stumbled upon a dessert that could charm any chocolate lover’s heart. Imagine a rich, fudgy brownie base, layered with smooth, creamy cheesecake, and then finished with a tangy burst of sweet cherry goodness. This easy recipe transforms into a showstopper in just 30 minutes, making it the perfect treat for special occasions or simply to brighten your day. Whether you’re a seasoned home chef or a kitchen newbie, these brownie bars promise an indulgent experience without hours of labor. Plus, you can easily tailor them with your favorite fruit fillings for a personal twist! Ready to impress family and friends? Let’s dive into this delightful dessert that’s sure to become your new go-to!
Why Are These Bars So Irresistible?
Fudgy Delight: The combination of rich chocolate brownies and creamy cheesecake creates a moist, indulgent treat that will have your taste buds dancing.
Quick and Easy: Experience gourmet flavor without the fuss—these Cherry Cheesecake Brownie Bars come together in just 30 minutes, perfect for last-minute gatherings or a sweet craving.
Customizable Appeal: Love blueberries or raspberries? Feel free to swap cherry pie filling for any fruit you adore, making this dessert versatile for any palate.
Crowd-Pleasing Wonder: Whether it’s a birthday party, potluck, or just a cozy night in, these bars are bound to impress everyone at the table!
Make-Ahead Magic: They store beautifully in the fridge for up to 5 days or can be frozen for future enjoyment, ensuring you always have a delightful treat on hand.
Pair them with a dollop of whipped cream or drizzle chocolate sauce for that extra flourish! If you’re craving more sweet ideas, check out my Strawberry Cheesecake Dip or delicious Caramel Cheesecake Cookies for more dessert inspiration!
Cherry Cheesecake Brownie Bars Ingredients
For the Brownie Layer
• Butter – Adds richness and moisture; use unsalted for better control over saltiness.
• Sugar – Provides essential sweetness for both layers; granulated sugar is the best choice.
• Eggs – Binds the brownie and cheesecake layers; room temperature eggs yield the best results.
• Vanilla Extract – Enhances flavor depth; avoid imitation vanilla for superior taste.
• All-Purpose Flour – Gives structure to the brownies; can substitute with a gluten-free blend if desired.
• Cocoa Powder – Essential for that deep chocolatey flavor; unsweetened cocoa powder is recommended.
• Salt – Balances sweetness and enhances overall flavor.
For the Cheesecake Layer
• Cream Cheese – Forms the base of the cheesecake layer; ensure it’s softened to avoid lumps.
• Cherry Pie Filling – Adds a sweet and fruity topping; fresh or frozen cherries mixed with sugar and cornstarch can be used as a delicious alternative.
Create these Cherry Cheesecake Brownie Bars that are sure to wow everyone, with a perfect blend of flavors and textures!
Step‑by‑Step Instructions for Cherry Cheesecake Brownie Bars
Step 1: Preheat and Prepare the Pan
Begin by preheating your oven to 350°F (175°C). While the oven is heating, grab a 9×13-inch baking pan and grease it thoroughly with butter or non-stick spray. This step is crucial to ensure your Cherry Cheesecake Brownie Bars release easily after baking, providing a perfect finish for serving.
Step 2: Make the Brownie Batter
In a large mixing bowl, combine melted unsalted butter and granulated sugar until the mixture is smooth and glossy. Next, add in eggs—preferably at room temperature—and vanilla extract, mixing until everything is well incorporated. Now, gently fold in all-purpose flour, unsweetened cocoa powder, and a pinch of salt. Stir until the brownie batter is just combined, avoiding overmixing to maintain fudginess.
Step 3: Bake the Brownie Layer
Pour the prepared brownie batter into the greased pan, spreading it evenly across the bottom. Bake in the preheated oven for 15 minutes, until the edges are set, but the center remains slightly soft. This initial baking creates a perfect foundation for your Cherry Cheesecake Brownie Bars, ensuring they hold their texture while allowing for a delectable cheesecake layer.
Step 4: Prepare the Cheesecake Mixture
While the brownie layer is baking, get another bowl and beat softened cream cheese with sugar until the mixture is smooth and creamy. Incorporate an egg and a splash of vanilla extract, mixing until everything is fully combined and silky. This creamy cheesecake layer adds a luscious richness to your cherry-topped bars.
Step 5: Combine Layers and Add Cherry Topping
Once the brownie layer has baked for 15 minutes, carefully remove it from the oven and pour the cheesecake mixture over the top. Gently dollop cherry pie filling on top, distributing it evenly. Use a knife or skewer to swirl these toppings together slightly; this creates a beautiful marbled effect in your Cherry Cheesecake Brownie Bars.
Step 6: Final Bake and Cool
Return the pan to the oven and bake for an additional 30 minutes, or until the cheesecake layer is set and the edges are firm. A light jiggle in the center is normal; it will firm up as it cools. Allow the bars to cool completely in the pan on a wire rack—this may take about 2 hours—before slicing them into delicious squares.
Make Ahead Options
These Cherry Cheesecake Brownie Bars are perfect for meal prep enthusiasts! You can prepare the brownie layer up to 24 hours in advance, allowing it to cool completely before covering it tightly with plastic wrap to prevent drying out. You can also make the cheesecake layer separately and refrigerate it for up to 3 days. When you’re ready to bake, simply pour the cheesecake mixture over the brownie layer, add the cherry pie filling, and swirl it all together before returning it to the oven. By prepping ahead, you simplify your baking process and ensure that your bars turn out just as delicious as if made fresh!
How to Store and Freeze Cherry Cheesecake Brownie Bars
Fridge: Keep your Cherry Cheesecake Brownie Bars in an airtight container, where they can stay fresh for up to 5 days. This ensures they remain delicious and ready to enjoy.
Freezer: For longer storage, these bars can be frozen for up to 3 months. Wrap each slice individually in plastic wrap and place them in a freezer-safe container.
Thawing: When you’re ready to indulge, simply thaw the bars overnight in the fridge. This helps maintain their creamy texture and enhances the flavors.
Reheating: If you prefer them warm, heat your slices in the microwave for about 10-15 seconds, just until warmed through. Enjoy!
What to Serve with Cherry Cheesecake Brownie Bars
Elevate your dessert experience with pairings that balance sweetness and add contrasting flavors.
-
Whipped Cream: A dollop of fresh whipped cream adds lightness to each indulgent bite, creating a perfect balance.
-
Vanilla Ice Cream: This classic companion melts joyfully over the warm brownie bars, creating a delightful fusion of flavors and temperatures.
-
Fresh Berries: Beautifully tart raspberries or blueberries bring a refreshing zing that cuts through the richness, enhancing the overall dessert experience.
-
Chocolate Drizzle: A silky drizzle of melted chocolate offers an extra layer of decadence, elevating the look and taste of your bars.
-
Coffee: A warm cup of coffee complements the chocolate and cherry flavors, making each bite even more gratifying.
-
Sparkling Water: A chilled glass of sparkling water adds a refreshing palate cleanser between bites, enhancing all flavors beautifully.
-
Milkshake: For a fun twist, pair your bars with a cherry-infused milkshake, amplifying the fruity notes and bringing nostalgic vibes.
-
Nutty Biscotti: Serve alongside crunchy almond biscotti for a delightful textural contrast that adds an element of sophistication.
-
Zesty Lemonade: The bright flavors of homemade lemonade provide a refreshing, tangy counterpoint that harmonizes with the dessert perfectly.
Expert Tips for Cherry Cheesecake Brownie Bars
-
Room Temperature Cream Cheese: Ensure your cream cheese is at room temperature to prevent lumps in the cheesecake layer, creating a smooth finish.
-
Avoid Overmixing: Mix the brownie batter just until combined to achieve that fudgy texture; overmixing can result in a cake-like consistency instead of dense brownies.
-
Cooling Time Matters: Allow the bars to cool completely for about 2 hours before slicing. This enhances the flavors and makes for cleaner edges when cutting.
-
Use a Hot Knife: For perfectly cut squares, dip your knife in hot water, wipe it dry, and then slice. This helps avoid jagged edges of your Cherry Cheesecake Brownie Bars.
-
Experiment with Flavors: Feel free to swap the cherry pie filling with other fruits, like blueberries or raspberries, for a delightful twist that suits your taste buds!
Cherry Cheesecake Brownie Bars Variations
Feel free to get creative with these bars and make them your own—your taste buds will thank you!
-
Fruit Filling Swap: Replace cherry pie filling with fresh blueberries, raspberries, or diced strawberries for a delightful variation. Each fruit brings its own unique flavor and sweetness!
-
Flavored Cheesecake: Add a splash of almond or lemon extract to the cheesecake layer for an exciting twist. This small change can elevate the taste to a whole new level.
-
Chocolate Lovers Delight: Stir in some chocolate chips into the brownie layer for an extra chocolatey experience. Melting chocolate pockets add an irresistible richness.
-
Nutty Crunch: Incorporate chopped nuts, like walnuts or pecans, into the brownie layer for a delightful crunch. The contrast in texture adds an enticing layer of flavor.
-
Gluten-Free Option: Use a gluten-free flour blend in place of all-purpose flour to make these bars suitable for gluten-sensitive friends. No one will miss the wheat in this decadent treat!
-
Swirled Goodness: Create a marbled effect by swirling in some chocolate ganache atop the cheesecake layer before baking. This not only looks stunning but tastes heavenly.
-
Spice It Up: Add a sprinkle of cinnamon or nutmeg to the brownie batter for a warm spice note that complements the chocolate beautifully. It’s a comforting twist perfect for fall!
-
Dress It Up: Serve with a dollop of whipped cream or a drizzle of caramel sauce for an extravagant finish. It adds an indulgent touch that truly makes these bars a showstopper!
Enjoy experimenting with these variations, and don’t forget to check out my delightful Funfetti Cheesecake Cake for another fun dessert idea!
Cherry Cheesecake Brownie Bars Recipe FAQs
How do I choose the best cherries for the topping?
Absolutely! When selecting cherries for your Cherry Cheesecake Brownie Bars, look for plump, shiny cherries without any dark spots all over. If you’re using fresh cherries, they should be firm to the touch. For ease, cherry pie filling is a convenient option, but if you’re using fresh cherries, remember to mix them with a bit of sugar and cornstarch before topping to create that sweet, jam-like consistency.
How should I store my Cherry Cheesecake Brownie Bars?
Very simply! To keep your Cherry Cheesecake Brownie Bars fresh, store them in an airtight container in the refrigerator for up to 5 days. Make sure they are completely cooled first to avoid any condensation, which could make them soggy.
Can I freeze Cherry Cheesecake Brownie Bars?
Yes, you can! I often make a double batch and freeze some for later. To freeze, wrap each bar individually in plastic wrap and place them in a freezer-safe container. They will stay good for up to 3 months. When you’re ready to enjoy them, simply thaw overnight in the fridge.
What if my cheesecake layer jiggles when I take it out of the oven?
That’s perfectly normal! The cheesecake layer will firm up as it cools. I recommend letting your bars cool completely in the pan, which typically takes about 2 hours. If you notice too much jiggle, bake them for an extra few minutes, keeping a close eye to avoid overcooking.
Are there any allergies to consider with this recipe?
Definitely! This recipe contains common allergens, including dairy (cream cheese and butter) and eggs. If you’re making these bars for someone with these allergies, consider using dairy-free cream cheese and a flax egg as a substitute—mix 1 tablespoon of ground flaxseed with 2.5 tablespoons of water, letting it sit for 5 minutes before adding it to the batter.
What’s the best way to reheat these bars?
If you prefer your Cherry Cheesecake Brownie Bars warm, I recommend reheating them in the microwave. Heat for about 10-15 seconds until just warm to the touch. This keeps them soft and gooey without altering the creamy cheesecake layer’s texture!

Cherry Cheesecake Brownie Bars to Wow Your Taste Buds
Ingredients
Equipment
Method
- Preheat your oven to 350°F (175°C) and grease a 9×13-inch baking pan.
- In a large mixing bowl, mix melted butter and sugar until smooth. Add eggs and vanilla, mix well. Fold in flour, cocoa powder, and salt until combined.
- Pour the brownie batter into the greased pan and bake for 15 minutes.
- While baking, beat cream cheese and sugar until creamy. Add egg and vanilla; mix until smooth.
- Pour the cheesecake mixture over the brownie layer. Add cherry pie filling on top and swirl gently.
- Bake for an additional 30 minutes and cool completely for 2 hours.
Leave a Reply