
Late-night cravings often lead to spontaneous kitchen adventures, don’t they? For those moments when you want something comforting yet effortless, I’m excited to share my semi homemade chili cheese fries recipe. Picture crisp, golden fries, perfectly crowned with savory chili and a generous layer of melty cheese—it’s an ultimate comfort food solution that checks all the boxes. Not only does this recipe come together in record time, perfect for busy weeknights or hosting friends for game day, but its delightful customization options mean you can add your favorite toppings for an even more personal touch. Why settle for fast food when you can create this easy, satisfying dish at home? Ready to dive into the deliciousness? Let’s get cooking!

Why are these Chili Cheese Fries irresistible?
Comfort Food Heaven: This recipe delivers all the cozy feels with its crispy fries and hearty chili, making it perfect for gatherings or quiet nights in.
Quick and Easy: With just a few simple ingredients and minimal prep time, you can whip these up in under 30 minutes—ideal for those last-minute cravings.
Customizable Flavors: Whether you prefer classic toppings or adding a spicy kick with jalapeños, the options are limitless, allowing everyone to enjoy their unique twist!
Perfect for Sharing: These chili cheese fries are a crowd-pleaser that’ll have everyone coming back for seconds, making them fantastic for parties or family movie nights.
Want to elevate your meal even more? Check out my Fig Goat Cheese for a sophisticated side dish!
Chili Cheese Fries Ingredients
For the Fries
• Frozen French Fries – A crispy base; any variety works, from classic to sweet potato.
• Seasoning Salt – Optional flavor enhancer; adds an extra kick for those special moments.
For the Chili
• Chili (20 oz) – The hearty star of the dish; go for store-bought or homemade, but choose chili without beans for the best flavor.
For the Toppings
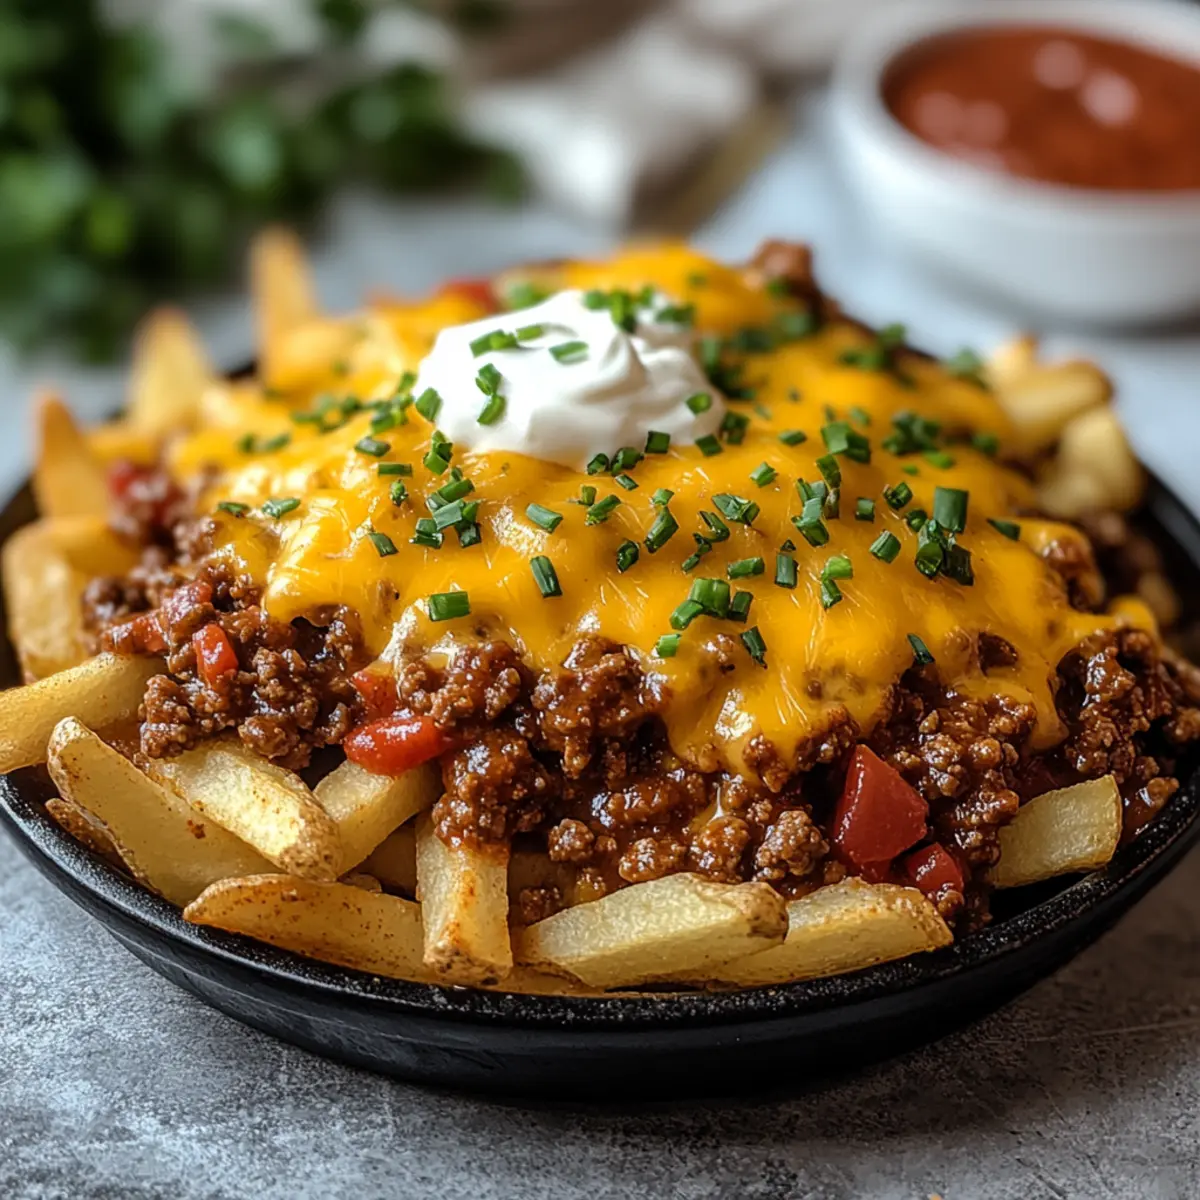
• Shredded Cheese (2 cups) – Creamy goodness; sharp cheddar is my favorite for its bold taste.
• Sour Cream – Adds a creamy, tangy dimension; highly recommended for that extra touch.
• Chives or Green Onions – Freshness and color to elevate both flavor and presentation!
Dive into this scrumptious Chili Cheese Fries creation and prepare for a little slice of comfort food heaven! 🌟
Step‑by‑Step Instructions for Semi Homemade Chili Cheese Fries
Step 1: Preheat the Oven
Begin by preheating your oven to 425°F (220°C). This high temperature is essential for achieving perfectly crispy fries. While the oven heats, gather your ingredients so you’re ready to assemble your semi homemade chili cheese fries efficiently.
Step 2: Prepare the Fries
Spread the frozen French fries in a single layer on a baking sheet, ensuring they have space between them to promote even cooking. Lightly sprinkle with seasoning salt to enhance their flavor. Once the oven is heated, place the baking sheet inside and bake for approximately 25 minutes or until they are golden brown and crispy.
Step 3: Heat the Chili
While the fries are baking, pour your chili into a saucepan. Set the heat to medium and allow the chili to warm up, stirring occasionally. You want it thoroughly heated, which usually takes about 10 minutes. This aromatic and robust chili will be the perfect hearty topping for your fries.
Step 4: Assemble the Fries
When the fries are perfectly crispy, carefully transfer them to an oven-safe plate. Make sure to layer them generously with the hot chili, ensuring each fry gets its share of the savory topping. The contrast of the hot chili against the crispy fries is what makes these semi homemade chili cheese fries truly irresistible.
Step 5: Add the Cheese
Now, it’s time to treat your chili cheese fries! Generously sprinkle shredded cheese over the top of the chili-covered fries. The cheese will melt and become wonderfully gooey, enhancing the dish’s indulgent nature.
Step 6: Broil to Perfection
Place the loaded plate under the broiler for about 4-5 minutes. Keep a close eye during this step, as broiling caramelizes the cheese quickly. Look for that beautiful, bubbly, and slightly golden melt to confirm it’s time to take those semi homemade chili cheese fries out of the oven.
Step 7: Serve and Garnish
Finally, remove your delicious creation from the oven and let it cool for a moment. Serve immediately with optional toppings like a dollop of sour cream and a sprinkle of chives or green onions for a fresh touch. Dive into your warm, cheesy chili fries and enjoy every comforting bite!
Make Ahead Options
These Semi Homemade Chili Cheese Fries are a perfect option for meal prep enthusiasts looking to save time! You can prepare the chili up to 3 days in advance; simply cook it as directed, allow it to cool, and store it in an airtight container in the refrigerator. For the fries, you can bake them ahead of time and leave them out, but to keep them crispy, it’s best to store them in the fridge for up to 24 hours and then reheat them in the oven before serving. When you’re ready to enjoy your chili cheese fries, just assemble everything on a plate, sprinkle with shredded cheese, and pop them under the broiler for 4-5 minutes. This way, you’ll achieve that gooey, cheesy finish that makes them just as delicious as if made fresh!
How to Store and Freeze Chili Cheese Fries
Fridge: Store leftover chili cheese fries in an airtight container for up to 3 days. This will help retain their flavor and texture.
Freezer: For longer storage, freeze the chili separately from the fries in airtight containers for up to 3 months. Reheat the chili and make fresh fries for the best texture.
Reheating: Reheat in the oven for approximately 10-15 minutes at 350°F (175°C) to restore crispiness. Avoid using the microwave, as it can make the fries soggy.
Chili Storage: If you have extra chili, store it in an airtight container in the refrigerator for up to 3 days or freeze it for up to 3 months. It’s a versatile topping for many meals!
Chili Cheese Fries Variations & Substitutions
Feel free to make these chili cheese fries your own with these delightful twists and options!
-
Spicy Kick: Add sliced jalapeños or pickled peppers for an extra boost of heat and flavor. They’ll provide an exhilarating contrast to the creamy cheese!
-
Cheese Variety: Mix it up with different types of cheese like pepper jack for a spicy twist, or mozzarella for a milder experience. Each cheese brings its own flair!
-
Homemade Fries: For a fresher touch, consider using homemade fries made from russet potatoes. Cut them thick and season to your liking before baking!
-
Vegetarian Alternative: Swap out ground beef for lentils or black beans to create a hearty vegetarian chili. It’s perfect for those looking for meat-free options that still satiate hunger.
-
Sweet Potato Fries: Change the base by using sweet potato fries instead for a hint of sweetness that pairs wonderfully with chili’s savory richness. They are a delicious and nutritious alternative!
-
Extra Creaminess: Top with a swirl of creamy avocado or guacamole in place of sour cream for a fresh, rich flavor that compliments the dish beautifully.
-
Topping Hustle: Incorporate toppings like diced tomatoes, corn, or olives for added freshness and texture. Each bite will be a delightful surprise!
-
Leftover Magic: Use leftover chili cheese fries as a filling for burritos, quesadillas, or even as a base for nachos. There’s no waste with this delightful dish!
Discover how delicious sides can elevate your meal by checking out my favorite Raspberry Cream Cheese or try a decadent Blueberry Cream Cheese dessert afterwards!
What to Serve with Semi Homemade Chili Cheese Fries
Elevate your meal to an unforgettable experience with these delightful pairings that complement the rich, cheesy goodness of your fries.
-
Crispy Onion Rings: The crunch of onion rings provides a delightful contrast to the softness of the chili cheese fries, adding a sweet and savory touch.
-
Zesty Guacamole: Creamy guacamole brings a refreshing element with its bright flavors and smooth texture, making every bite even more enjoyable.
-
Fresh Salad: A simple green salad with tangy vinaigrette balances the heartiness of the chili cheese fries, adding a burst of freshness.
-
Homemade Ranch Dressing: Perfect for dipping, ranch dressing enhances the flavors of your fries while adding a creamy, herby punch.
-
Sweet Cornbread: Enjoy a slice of moist cornbread for a sweet and comforting contrast, perfect for soaking up the chili’s richness.
-
Spicy Margaritas: A refreshing, spicy margarita elevates your meal, creating a fun pairing that mirrors the bold flavors of the chili cheese fries.
-
Chocolate Chip Cookies: End your meal on a sweet note with warm chocolate chip cookies, offering a delicious contrast to the savory flavors you’ve enjoyed.
Expert Tips for Chili Cheese Fries
-
Don’t Overcrowd the Fries: Ensure fries are spaced out on the baking sheet; crowding can lead to steaming, resulting in soggy chili cheese fries.
-
Broiling with Care: Keep a watchful eye while broiling; the cheese can bubble and burn quickly. You want it perfectly melted, not charred.
-
Make Ahead for Flavor: Consider preparing your chili a day in advance. This allows the flavors to meld beautifully, enhancing your semi homemade chili cheese fries experience.
-
Try Different Cheeses: Experiment with a mix of cheeses such as Monterey Jack or pepper jack for added flavor dimensions. A variety can elevate your chili cheese fries!
-
Garnish for Freshness: Don’t skip the fresh toppings! A sprinkle of chives or green onions not only adds color but elevates the overall taste of your dish.
-
Storing Leftovers: Store any leftovers in an airtight container for up to 3 days. Reheat gently in the oven to maintain crispness.

Semi Homemade Chili Cheese Fries Recipe FAQs
What type of fries should I use for chili cheese fries?
Opt for frozen French fries as the base for your chili cheese fries. I recommend any style you enjoy—whether it’s classic, crispy, or sweet potato. Just ensure they stay in a single layer on the baking sheet for optimal crispiness.
How long can I store leftover chili cheese fries?
Store leftover chili cheese fries in an airtight container in the fridge for up to 3 days. It’s important to keep them sealed to maintain their flavor and texture. When you’re ready to enjoy them again, I suggest reheating in the oven to avoid sogginess.
Can I freeze chili cheese fries?
Absolutely! To freeze, separate the chili and fries into airtight containers. Freeze the chili for up to 3 months. When you’re ready to eat, thaw the chili in the fridge overnight, then bake fresh fries and top them with the warmed chili for the best results.
What should I do if my fries become soggy after baking?
To avoid soggy fries, make sure they are spread out on the baking sheet and not overcrowded. If they do get soggy, you can try baking them at a higher temperature for an additional 5-10 minutes to regain some crispiness.
Are there any dietary considerations I should keep in mind?
If you or your guests have dietary considerations, it’s best to check the labels on the fries and chili for allergens like gluten or dairy. For a healthier twist, you could swap out traditional fries for sweet potato fries or even try a vegetarian chili option if you prefer.
Can I use homemade chili for my chili cheese fries?
Absolutely! Homemade chili can add a wonderful depth of flavor to your dish. Just make sure it’s well-seasoned and heated thoroughly before layering it over your freshly baked fries for that delicious chili cheese experience.

Delicious Chili Cheese Fries: Ultimate Comfort Food Recipe
Ingredients
Equipment
Method
- Preheat your oven to 425°F (220°C). Gather all ingredients for ease of use.
- Spread the frozen French fries in a single layer on a baking sheet. Sprinkle with seasoning salt and bake for approximately 25 minutes.
- Heat the chili in a saucepan over medium heat, stirring occasionally, until warmed through (about 10 minutes).
- Transfer crispy fries to an oven-safe plate and layer generously with hot chili.
- Sprinkle shredded cheese over the chili-covered fries and place under the broiler for 4-5 minutes until melted.
- Remove from the oven, let cool slightly, and serve immediately with optional toppings.
Leave a Reply